AVX/SSE AND CONTEXT SWITCHING
2014-03-18

This article describes the way I designed AVX/SSE support in my homebrew OS.
AVX registers
In long mode, there are 16 XMM registers. These registers are 128bit long. With AVX, these registers
are extended to 256 bit and named YMM. The YMM registers are not new registers, they are only extensions.
YMM0 is to XMM0 what AX is to AL. Meaning that XMM0 represents the lower 128bit of the YMM0 register.
The xcr0 register enables processor states saving for XSAVE and XRSTOR instructions.
The way to set bits in xcr0 is by using the XSETBV instruction. These bits represents feature sets.
- 0b001: FPU feature set. Will save/restore content of FPU registers
- 0b010: XMM feature set. Will save/restore all XMM registers (128bit)
- 0b100: YMM feature set. Will save/restore upper half of YMM registers
Since YMM registers are 256 bit registers, and that XMM registers aliases the lower 128 bits of the YMM register,
it is important to enable bit 2 and 1 in order to save the entire content of the YMM registers.
Enabling AVX support
- Enable monitoring media instruction to generate #NM when CR0.TS is set: CR0.MP (bit 1) = 1
- Disable coprocessor emulation: CR0.EM (bit 2) = 0
- Enable fxsave instruction: CR4.OSFXSR (bit 9) = 1
- Enable #XF instead of #UD when a SIMD exception occurs: CR4.OSXMMEXCPT (bit 10) = 1
- Enable XSETBV: CR4.OSXSAVE (bit 18)= 1
- Enable FPU, SSE, and AVX processor states: XCR0 = 0b111
mov     %cr0,%rax
or      $0b10,%rax
and     $FFFFFFFFFFFFFFFD,%rax
mov     %rax,%cr0

mov     %cr4,%rax
or      $0x40600,%rax
mov     %rax,%cr4

mov     $0,%edx
mov     $0b111,%eax
mov     $0,%ecx
xsetbv
Context Switching
On a context switch, it is important to save the state of all 16 YMM registers if we want to avoid data corruption
between threads. Saving/restoring 16 256bit registers can add a lot of overhead to a context switch (we could
even wonder if implementing a fast_memcpy() is worth it because of that overhead). Saving/restoring is done
with the XSAVE and XRSTOR instruction. Each instruction take a memory operand that specifies the save area where
registers will be dumped/restored. These instructions also looks at the content of EDX:EAX to know with processor states
to save. EDX:EAX will be bitwise ANDed with XCR0 to determine which processor state to save/restore. In my case, I want
to use EDX:EAX= 0b110 to save XMM, YMM, but fpu. Remember, if we set 0b100, we will only get the upper half of
YMMx saved/restored. To get the lower half, we need to set bit 1 to enable XMM state saving.
Optimizing context switching - lazy switching
Since media instructions are not used extensively by all threads, it is possible that one thread does not use any media
instructions during a time slice (or even during its whole lifetime). In such a case, saving/restoring the whole AVX state
would add a lot of overhead to the context switch for absolutely nothing.
There is a workaround for this. In my OS, everytime there is a task switch, I explicitely set the TS bit in register CR0.
Everytime a media instruction is executed and that the CR0.TS bit is set, a #NM exception will be raised (Device Non Available).
My OS then handles that exception to save/restore the AVX context. So if a task does not use media instructions during a
time slice, then no #NM will be triggered so there will be no AVX context switch. The logic is simple.
- Assume that there is a global kernel variable called LastTaskThatRestoredAVX.
- On task switch, set CR0.TS=1
- media instruction is executed, so #NM is generated
- on #NM:
- clear CR0.TS
- if LastTaskThatRestoredAVX==current task, return from exception (still the same context!)
- XSAVE into LastTaskThatRestoredAVX's save area
- XRSTOR from current task's save area
- LastTaskThatRestoredAVX = current task
- Next media instruction to be executed will not trigger #NM, because we cleared CR0.TS
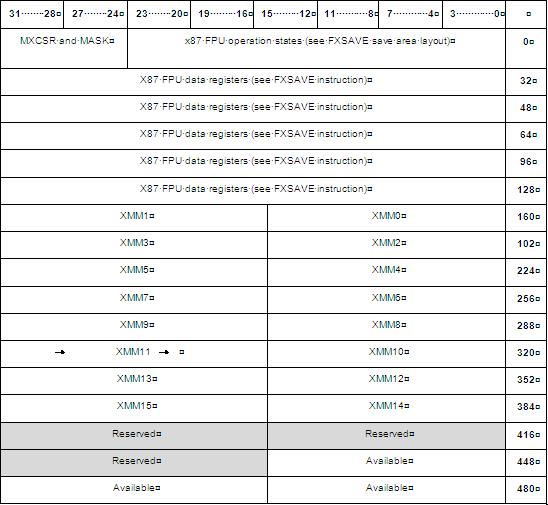
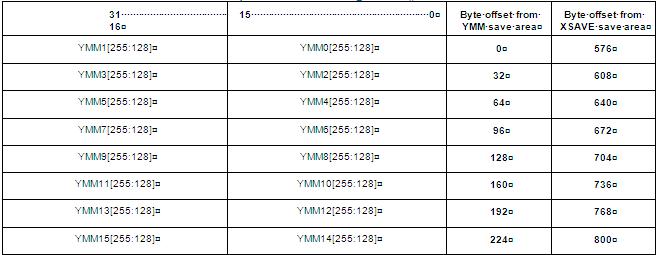
Save area
The memory layout of the saved registers will look like this (notice how highest 128bits of YMM registers are saved separately)
HOW TO ANSWER A QUESTION THE SMART WAY.
2014-01-06
Intro
The way I see it, the internet has made it easier for everyone to get answers and solutions for different problems. That's
the beauty of the internet: information is easily accessed. If you think about web forums, they allow people to talk to each other.
They allow you to ask a question and get an answer. Asking a question on a forum is easier that posting a question in a magazine
or trying to find something in an encyclopedia. If you look at the section "Before you ask" in Eric Steven Raymond's
"How To Ask Questions The Smart Way", he lists 7 steps that you should do before asking a question. Attempting those 7 steps
defeats the whole point of making information easily accessible. So what if a person asks a question on a forum without having
performed those 7 steps? Does it make it harder for you to answer the question? If you don't want to answer the question, then just
don't answer. In my opinion, if the question was asked before and the answer was already provided, there is no harm in providing
the answer a second time. The more the information is duplicated, the more it gets easy to find that information. If you
understand how the Google search engine works, you will know that this is true.
replying "Google it"
When a person asks a question and someone else replies "let me Google that for you" or just gives a link to a Google search, that
person should just not reply at all. How many times did I Google something, clicked the first result and landed on a forum where
the OP asked the exact same question that I am asking myself and the only answer is "Google it". Well I did Google it actually, and
I am landing on a page that says to Google it. Was it really hard to provide the right answer or to just ignore the OP?
replying "why would you wanna do it like that" or "you shouldn't do that"
I see that too often. The OP asks something like "I wanna print a document that I just scanned.... blah blah... how do I do it?"
and someone replies "why would you do that? just use the original document". Never mind why he wants to do it that way. Do you
know the answer or not? If you don't, then don't reply. The other day I was searching for "how to create SSH keys on behalf of another user".
I landed on a forum with where the OP asked that same question and there was one reply: "You should not do that because the private key
is private blah blah blah.". The person who replied that may find it stupid to do such a thing but I had very specific constraints
that pushed me into doing that. Maybe I have a script running as root that creates keys for users. Maybe I have other reasons too.
So if that person just found it odd to do such a thing and did not know the answer, maybe that person should have ignored the question.
Questions not to ask
in Eric Steven Raymond's "How To Ask Questions The Smart Way", you can find this:
Q: Where can I find program or resource X?
A: The same place I'd find it, fool at the other end of a web search. Ghod, doesn't everybody know how to use Google yet?
Let me get this straight, because you used to walk 4 miles in 4feet of snow to go to school, I shouldn't take the bus?
You just said that you found it at the other end of a web search, so do us a favor and share the information so we don't
have to do a big search like that. And by giving us the link and duplicating that answer, the link will end up ranking
high in Google.
Conclusion
"How To Ask Questions The Smart Way" seems to have been written by a smart person who is really tech savvy but has neither
the skills and patience to share his knowledge. That person should not become a teacher.
My philosophy is: Make the information easy to find. Why would I search a word in a dictionary when the guy sitting across me knows the
definition and could tell me right now? The days of the teachers saying "You'll learn more if you work at finding it" are over.
Make the information accessible. Duplicate the information and spend less time looking for answers. That's the whole point
of the "information super highway". At least that's how my employer thinks. My boss will be very mad if I spend 8 hours
searching for a solution on Google because a co-worker, who knows the answer, replies "Google it".
REALTEK 8139 NETWORK CARD DRIVER
2013-12-03
While building my homebrew OS, I go to the point where I needed a netcard driver.
I run my os in QEMU, which provides a RealTek 8139 netcard. The specs for that card are very
easy to find.
Before I continue, you should know that when the datasheet specifies a register that is
2 bytes long (like ISR), it is important to read it as a 16bit word even if all you
need is the first 8bit. I was reading ISR with "inb" and couldn't make my software
work event if all I needed was the first byte. Changing "inb" for "inw" worked. The datasheet
indicates that some registers need to be read or written as words or dwords even if it
looks like they could be accessed as bytes.
Initializing
This is my init code. Note that there is some PCI stuff in there that I don't describe. I am assuming that you
have a PCI driver written at this point
void initrtl8139()
{
    unsigned int templ;
    unsigned short tempw;
    unsigned long i;
    unsigned long tempq;

    deviceAddress = pci_getDevice(0x10EC,0x8139); // vendor, device. Realtek 8139
    if (deviceAddress == 0xFFFFFFFF)
    {
        pf("No network card found\r\n");
        return;
    }

    for (i=0;i<6;i++)
    {
        unsigned int m = pci_getBar(deviceAddress,i);
        if (m==0) continue;
        if (m&1)
        {
            iobase = m & 0xFFFC;
        }
        else
        {
            memoryAddress = m & 0xFFFFFFF0;
        }
    }

    irq = pci_getIRQ(deviceAddress);
    registerIRQ(&handler,irq);
    pci_enableBusMastering(deviceAddress);

    // Activate card
    OUTPORTB(0,iobase+0x52);

    // reset
    unsigned char v=0x10;
    OUTPORTB(v,iobase+0x37);
    while ((v&0x10)!=0)
    {
        INPORTB(v,iobase+0x37);
    }

    INPORTL(templ,iobase+4);
    tempq = templ;
    tempq = tempq <<32;
    INPORTL(templ,iobase);
    tempq |= templ;
    macAddress = tempq;
}


void rtl8139_start()
{
    // Enable TX and RX:
    OUTPORTB(0b00001100,iobase+0x37);

    // Set the Receive Configuration Register (RCR)
    OUTPORTL(0x8F, iobase+0x44);

    // set receive buffer address
    // We need to uses physical addresses for the RX and TX buffers. In our case, we are fine since
    // we are using identity mapping with virtual memory.
    OUTPORTL((unsigned char*)&rxbuf[0], iobase+0x30);  // this is a 10k buffer

    // set TX descriptors
    OUTPORTL((unsigned char*)&txbuf[0][0], iobase+0x20); // 2k alligned buffers
    OUTPORTL((unsigned char*)&txbuf[1][0], iobase+0x24);
    OUTPORTL((unsigned char*)&txbuf[2][0], iobase+0x28);
    OUTPORTL((unsigned char*)&txbuf[3][0], iobase+0x2C);

    // enable Full duplex 100mpbs
    OUTPORTB(0b00100001, iobase+0x63);

    //enable TX and RX interrupts:
    OUTPORTW(0b101, iobase+0x3C);
}
Receiving
Since we have enabled the ROK and TOK interrupts, we will receive and interrupt when a new frame
arrives. So from my interrupt handler I check the ISR register to know if I got a TOK
or ROK. if ROK, then proceed with getting the frame. First, some definitions:
- CAPR: This register holds the address within the RX buffer where the driver should read
the next frame. This register must be incremented by the driver when a frame is read.
The netcard will check that register to determine if a buffer overrun is occuring.
- packet header: This is a 4bytes field that is found at the begining of the frame. The first word is a bitfield
indicating if the frame is OK, if it was received as part of multicast ect. More information can
be found in section 5.1 of the datasheet. The following 2 bytes indicate the size of the frame
This is what I do:
- 1) Trigger on interrupt: Since interrupts have been enabled, IRQ will have been raised.
So this will be done from the handler. We need to check TOK in the ISR register
- 2) Get position of frame within the RX buffer by reading CAPR
- 3) Get size of data: 2nd 16bit word from begining of buffer (CAPR+2)
- 4) copy the frame: address starts at rx_buffer_base+CAPR
- 5) Update CAPR: CAPR=((rxBufIndex+size+4+3)&0xFFFC)-0x10
We are adding 4 to take into account the header size and the +3&0xFFFC is to align on a 4bytes boundary. I have no idea
why we need to substract 0x10 from there. Note that you should keep track of rxBufIndex separately. I.e: do not update it with CAPR everytime.
- 6) Check BUFE bit in CMD. if set, go back to step 2
- 7) write 1 to ROK in the ISR register
The receiving function:
unsigned long rtl8139_receive(unsigned char** buffer)
{
    if (readIndex != writeIndex)
    {
        unsigned short size;
        unsigned short i;
        unsigned char* p = rxBuffers[readIndex];
        size = p[2] | (p[3]<<8);
        if (!(p[0]&1)) return 0; // PacketHeader.ROK
        *buffer = (char*)&p[4]; // skip header
        readIndex = (readIndex+1) & 0x0F; // increment read index and wrap around 16
        return size;
    }
    else
    {
        return 0;
    }
}
I also wrote A 64bit memcpy in a separate ASM file
// rdi = source, rsi = destination, rdx = size
memcpy64:
    push    %rcx
    xchg    %rdi,%rsi
    mov     %rdx,%rcx
    shr     $3,%rcx
    rep     movsq
    mov     %rdx,%rcx
    and     $0x07,%rcx
    rep     movsb
    pop     %rcx
    ret
The interrupt handler:
unsigned short isr;
INPORTW(isr,iobase+0x3E);
OUTPORTW(0xFFFF,iobase + 0x3E);
unsigned int status;
unsigned char  cmd=0;
unsigned short size;
unsigned short i;
if (isr&1)                  // ROK
{
        // It is very important to check this first because it's possible to get an interrupt
        // and still have cmd.BUFE set to 1. that caused me lots of problems like
        // reading bad status, causing buffer overflows
        INPORTB(cmd,iobase+0x37);

	while (!(cmd&1))   // check if CMD.BUFE == 1
	{
		// if last frame overflowed buffer, this won't will start at rxBufferIndex%RX_BUFFER_SIZE instead of zero
		if (rxBufferIndex>=RX_BUFFER_SIZE) rxBufferIndex = (rxBufferIndex%RX_BUFFER_SIZE);

		status =*(unsigned int*)(rxbuf+rxBufferIndex);
		size = status>>16;

                memcpy64((char*)&rxbuf[rxBufferIndex],(char*)&rxBuffers[writeIndex][0],size);

                rxBufferIndex = ((rxBufferIndex+size+4+3)&0xFFFC);
		OUTPORTW(rxBufferIndex-16,iobase+0x38);
		writeIndex = (writeIndex+1)&0x0F;
		if (writeIndex==readIndex)
		{
			// Buffer overrun
		}
		INPORTB(cmd,iobase+0x37);
	}
}
Sending
I found that Sending was easier than receiving. The first thing that needs to be done is to setup the buffer pointers in TSAD0-TSAD3.
I'm not sure if these buffers require any special alignment but I've aligned mine on 2k boundaries.
Sending a frame
There are 4 TX buffers available. You should keep track of which one is free by incrementing an index everytime you send a frame.
This way, you will know what buffer to use next time. You will need to copy your frame into the buffer pointed to by TSAD[CurrentSendIndex].
You will then need to write the size of the frame into TSD[CurrentSendIndex] and clear bit 13. Bit 13 is the OWN bit. It indicates to the card that
this buffer is ready to be transmitted. Then you increment CurrentSendIndex to be ready for next time. At the next send, if TSD[CurrentSendIndex].bit13
is cleared, it means that the frame still belongs to the card and it wasn't transmitted. This would indicate a buffer overrun, your software
is sending faster than what the card can handle.
unsigned long rtl8139_send(unsigned char* buf, unsigned short size)
{
    if (size>1792) return 0;
    unsigned short tsd = 0x10 + (currentTXDescriptor*4);
    unsigned int tsdValue;
    INPORTL(tsdValue,iobase+tsd);

    if (tsdValue & 0x2000 == 0)
    {
        //the whole queue is pending packet sending
        return 0;
    }
    else
    {
        memcpy64((char*)&buf[0],(char*)&txbuf[currentTXDescriptor][0]);;
        tsdValue = size;
        OUTPORTL(tsdValue,iobase+tsd);
        currentTXDescriptor = (currentTXDescriptor+1)&0b11; // wrap around 4
        return size;
    }
}
Handling TX interrupt
Handling the interrupt is mostly done to detect send errors. I don't use it much. I won't go into details here, as the code
explains pretty much everything.
unsigned short isr;
INPORTW(isr,iobase+0x3E);
OUTPORTW(0xFFFF,iobase + 0x3E);
if (isr&0b100)              //TOK
{
	unsigned long tsdCount = 0;
	unsigned int tsdValue;
	while (tsdCount <4)
	{
		unsigned short tsd = 0x10 + (transmittedDescriptor*4);
		transmittedDescriptor = (transmittedDescriptor+1)&0b11;
		INPORTL(tsdValue,iobase+tsd);
		if (tsd&0x2000) // OWN is set, so it means that the data was transmitted to FIFO
		{
			if ((tsd&0x8000)==0)
			{
				//TOK is false, so the packet transmission was bad. Ignore that for now. We will drop it.
			}
		}
		else
		{
			// this frame is pending transmission, we will get another interrupt.
			break;
		}
		OUTPORTL(0x2000,iobase+tsd); // set lenght to zero to clear the other flags but leave OWN to 1
		tsdCount++;
	}
}
Documentation
These are good resources if you need more information on the rtl8139:
Get the full source code
REST INTERFACE ENGINE
2013-10-28
This is a REST engine API that I use for some of my projects. It is very simple to use and has no dependencies.
One of the nicest feature is that it documents the REST interface that you build with the engine. Note that this
is only a REST engine and does not include a web server. You still need to listen on a socket for incomming requests
and feed them to the engine and respond with the engine's output.
Defining your API and documenting it
Let's say you have an application that has a ShoppingCart object and you want to expose some of its functionality through a REST interface.
Defining the API is easy as this:
ShoppingCart *p = new ShoppingCart();
RESTEngine engine;

RESTCallBack *pc1 = new RESTCallBack(p,&ShoppingCart::addToCart,"This lets you add an item to a shopping cart");
pc1->addParam("id","Shopping cart ID");
pc1->addParam("sku","Item SKU");
pc1->addParam("qty","Quantity of that item to add");

RESTCallBack *pc2 = new RESTCallBack(p,&ShoppingCart::removeFromCart,"This lets you remove an item from a shopping cart");
pc2->addParam("id","Shopping cart ID");
pc2->addParam("sku","Item SKU");

engine.addCallBack("/shoppingcart/item","POST",pc1);
engine.addCallBack("/shoppingcart/item","DELETE",pc2);
Note how each resource uri and parameters are documented at creation time.
Invoking and processing query
To invoke a query, you only need to get the URI (after parsing it from a from a HTTP request or whatever other way) and feed it to the engine. Of course,
your API might want to return some data, so this is done by passing an empty JSON document object (JSON interface is part of the project as well. I told you,
there are no external dependencies in this project :) ) and the callbacks will populate it with the response.
Dumais::JSON::JSON j1,j2,j3;
engine.invoke(j1,"/shoppingcart/item?id=1&sku=242&qty=4","POST",bodyData);
engine.invoke(j2,"/shoppingcart/item?id=1&sku=244&qty=1","POST",bodyData);
engine.invoke(j3,"/shoppingcart/item?id=1&sku=244","DELETE",bodyData);
The engine will parse the parameters and route the requests to the proper callcacks. Callbacks are defined like this:
void ShoppingCart::addToCart(Dumais::JSON::JSON& j,RESTParameters* p, const std::string& data)
{
	std::string id = p->getParam("id");
	std::string sku = p->getParam("sku");
	std::string qty = p->getParam("qty");
	std::string test = p->getParam("test"); // this would return "" since param "test" was not defined as a valid param earlier.

	j.addValue("Item successfully added to cart","message");
}
Generate documentation
When creating the callbacks and the parameters, we defined a description for each of them. This means that the engine is aware of the documentation of
the created interface. This allows you to generate the documentation using RESTEngine::documentInterface(). This method will populate a JSON object
with the documentation of your API. Generating the documentation for our example here would give us:
{
	"api" : [
		{
			"description" : "This lets you add an item to a shopping cart",
			"path" : "/shoppingcart/item",
			"method" : "POST",
			"params" : [
				{
					"name" : "id",
					"description" : "Shopping cart ID"
				},
				{
					"name" : "sku",
					"description" : "Item SKU"
				},
				{
					"name" : "qty",
					"description" : "Quantity of that item to add"
				}
			]
		},
		{
			"description" : "This lets you remove an item from a shopping cart",
			"path" : "/shoppingcart/item",
			"method" : "DELETE",
			"params" : [
				{
					"name" : "id",
					"description" : "Shopping cart ID"
				},
				{
					"name" : "sku",
					"description" : "Item SKU"
				}
			]
		}
	]
}
With the documentation generated as a JSON document, it is easy to make a javascript application
that gets the list of API calls and lets you experiment with it for prototyping. I did an application
that gets the list of API and for each API calls, shows the parameters that are defined and
lets you enter a value in a text field. Then you can invoke the API call.
Thanks to William Tambellini for notifying me about a typo in this page
Source code download
Project can be found on github
javascript application to prototype